Complete Step Cutting Tutorial
Below is a step-by-step tutorial on how to perform step cutting using a walk-behind concrete saw. Step cutting is an effective technique for cutting through thick concrete slabs (typically over 6–12 inches) by making multiple shallow passes to achieve the desired depth. This tutorial assumes you have basic familiarity with concrete cutting equipment and safety protocols.
Step-by-Step Tutorial: Step Cutting with a Walk-Behind Saw
Tools and Materials Needed
Walk-behind concrete saw (gas, electric, or hydraulic, equipped with a diamond blade suitable for the material being cut)
Diamond blade (size and type appropriate for the slab thickness and material)
Water supply (for wet cutting to reduce dust and cool the blade)
Chalk line or marker for layout
Measuring tape and straightedge
Personal protective equipment (PPE): safety glasses, gloves, ear protection, dust mask or respirator, steel-toe boots, and high-visibility clothing
Shovel, pry bar, or vacuum for debris removal
Concrete slurry containment system (if wet cutting)
Safety Precautions
Always wear appropriate PPE.
Ensure the work area is clear of bystanders and hazards.
Check the saw for proper operation (blade condition, fuel/oil levels, water system).
Follow manufacturer guidelines for the saw and blade.
Be aware of rebar or embedded utilities in the concrete—use a ground-penetrating radar (GPR) if needed to locate them.
Ensure proper ventilation if working indoors or with a gas-powered saw.
Step-by-Step Instructions
Step 1: Plan and Mark the Cut
Determine the Cutting Area: Identify the section of concrete to be cut based on project requirements (e.g., for demolition, creating an opening, or removing a damaged section).
Measure and Mark: Use a measuring tape and straightedge to outline the cutting area. Mark the cut lines clearly with a chalk line or waterproof marker. Double-check measurements for accuracy.
Assess Slab Thickness: Measure or estimate the concrete slab’s thickness to determine the number of passes needed. For example, a 12-inch slab might require 3–4 passes, depending on the saw’s cutting depth capacity (typically 4–6 inches per pass for most walk-behind saws).
Step 2: Prepare the Walk-Behind Saw
Select the Right Blade: Diamond Blade Warehouse is here to help! Our sales specialists can identify the exact blades you need to maximize performance and cost efficiency. https://www.diamondbladewarehouse.com/catalog/wet-blades
Install the Blade: Follow the manufacturer’s instructions to securely mount the blade. Verify the blade’s rotation direction matches the saw’s spindle.
Check Water Supply: If wet cutting, connect the water supply to the saw’s cooling system. Ensure adequate water flow to minimize dust and cool the blade.
Inspect the Saw: Check fuel/oil levels (for gas saws) or power connections (for electric saws). Ensure all guards and safety features are in place.
Step 3: Set Up the Work Area
Clear the Area: Remove debris, tools, or obstacles from the cutting path.
Secure the Slab: Ensure the concrete slab is stable and won’t shift during cutting. If the slab is elevated or unsupported, use temporary supports or consult an engineer.
Set Up Slurry Containment: For wet cutting, place barriers or use a wet vacuum to manage concrete slurry runoff.
Mark Pass Depths: If precise depth control is needed, mark depth increments (e.g., 2–3 inches per pass) on the saw or use a depth gauge.
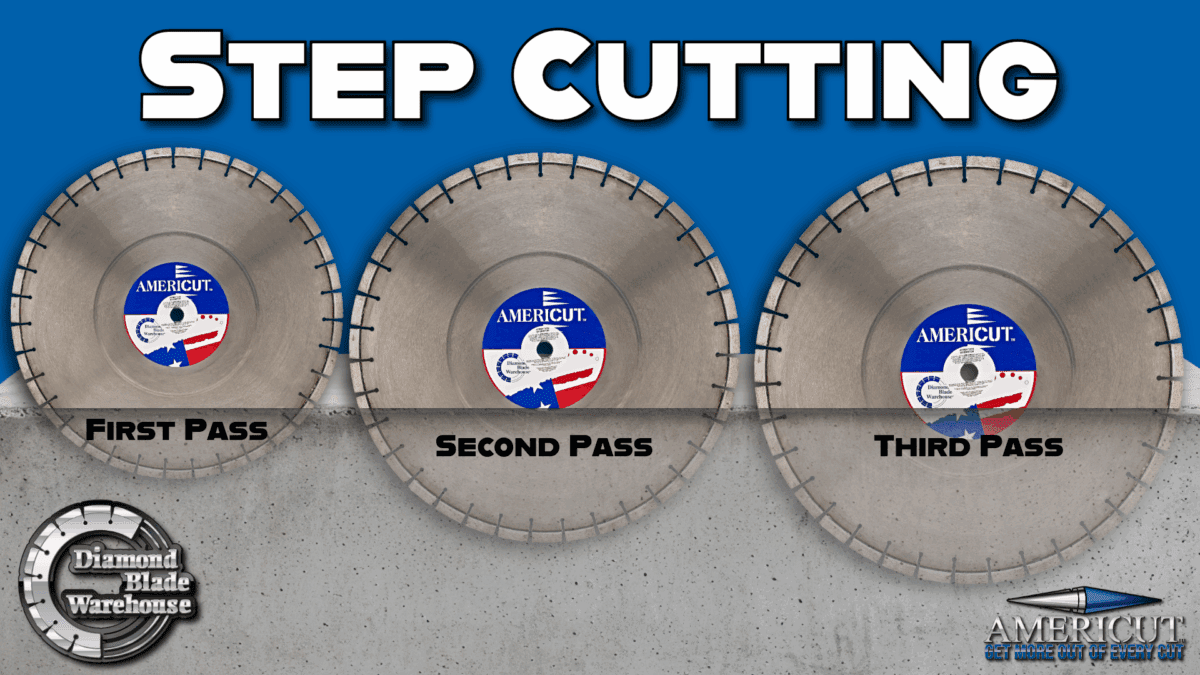
Step 4: Perform the First Cutting Pass
Always start with a wider diamond blade for your first pass. This will open the cut for the next step cuts.
Set Blade Depth: Adjust the saw’s depth control to cut 2–3 inches deep (or the maximum safe depth for the first pass, as recommended by the saw manufacturer).
Align the Saw: Position the saw so the blade aligns with the marked chalk line. Use the saw’s guide pointer for accuracy.
Start the Saw: Turn on the saw and allow the blade to reach full speed. If wet cutting, ensure water is flowing to the blade.
Cut Slowly and Steadily: Allow the saw and blade to pull itself through the cut. Avoid forcing the saw—let the blade do the work. Maintain a straight line and steady pressure.
Complete the Pass: Cut the entire length of the marked line. Stop the saw and lift the blade out of the cut.
Step 5: Perform Subsequent Passes (Step Cutting)
Increase Blade Depth: Adjust the saw to cut deeper for the next pass (e.g., an additional 2–3 inches). Do not exceed the blade’s or saw’s maximum cutting depth per pass.
Repeat the Cut: Realign the saw with the previous cut and make another pass along the same line. Ensure the blade follows the existing groove to maintain a clean, straight cut. Use a thinner blade vs the first pass.
Monitor Blade and Saw: Check for signs of blade wear, overheating, or binding. If the blade encounters rebar, slow the cutting speed to avoid damaging the blade.
Continue Stepping: Repeat the process, increasing the depth with each pass until the desired depth is reached or the slab is cut through. For a 12-inch slab, this may take 3–5 passes, depending on the saw’s capacity.
Step 6: Remove Cut Concrete and Clean Up
Remove Cut Sections: If the cut is complete (e.g., a full-depth cut), use a pry bar, shovel, or heavy equipment to lift and remove the cut concrete pieces. Be cautious, as cut sections can be heavy.
Clean the Area: Clear concrete dust and debris. For wet cutting, use a wet vacuum or squeegee to manage slurry.
Inspect the Cut: Verify the cut meets the required depth and dimensions. Smooth any rough edges if needed, using a grinder or hand tools.
Step 7: Maintain the Equipment
Clean the Saw: Remove concrete dust and slurry from the saw and blade. Rinse the blade and saw components if wet cutting was used.
Inspect the Blade: Check for wear, cracks, or missing segments. Replace the blade if damaged or worn.
Store Properly: Store the saw and blade in a dry, secure location to prevent damage.
Tips for Success
Cutting Depth per Pass: Limit each pass to 2–3 inches to avoid overloading the saw or blade, especially in reinforced concrete.
Rebar Considerations: If the slab contains rebar, use a diamond blade designed for cutting through steel and concrete. Slow the cutting speed when encountering rebar to prevent blade damage.
Dust Control: If dry cutting, use a dust collection system or ensure proper ventilation to minimize silica dust exposure.
Check Blade Cooling: For wet cutting, ensure consistent water flow to prevent blade overheating, which can cause warping or glazing.
Work in Teams: For large or heavy cuts, have a second person assist with guiding the saw or managing debris.
Common Mistakes to Avoid
Cutting Too Deep in One Pass: This can overheat the blade, stall the saw, or cause blade binding.
Misaligned Cuts: Failing to follow the previous cut’s groove can result in uneven or jagged edges.
Ignoring Safety: Skipping PPE or neglecting equipment checks can lead to accidents or injuries.
Inadequate Water Supply: Insufficient water during wet cutting can damage the blade or create excessive dust.
Additional Notes
If you’re new to step cutting, practice on a small, non-critical section of concrete to get a feel for the saw and technique.
For very thick slabs (e.g., >18 inches), consider using a wall saw or wire saw, as walk-behind saws may have depth limitations.
Always consult project specifications or a structural engineer if cutting near load-bearing areas to avoid compromising structural integrity.
If you have specific details about the slab (e.g., thickness, reinforcement, or project requirements) or need guidance on selecting the proper saw blades, please feel free to give Diamond Blade Warehouse a call.